Resizing images on mobile devices is crucial for managing storage space. Large image files can take up valuable room, making it difficult to store more photos, apps, or documents.
Additionally, resizing images makes it easier to upload and share them on social media, email, or websites. Smaller files upload faster and reduce data usage, which is especially useful when you’re on a limited data plan.
On Android devices, resizing images is simple. With the right apps and built-in tools, anyone can quickly reduce image size without losing quality, making the process both efficient and user-friendly.
Why You May Need to Resize Images on Android
- Storage Optimization: Resizing images helps free up space on your Android device. Large image files can quickly eat up storage, and shrinking them can prevent your phone from slowing down or running out of space.
- Faster Uploads: Smaller images upload much faster on social media, cloud storage, or when sending via email. This is especially helpful if you have a slower internet connection or a limited data plan.
- Email and Messaging Attachments: Many email services and messaging apps have size limits for attachments. Resizing your images ensures they fit within those limits, allowing for smooth sharing without errors.
- Optimizing for Websites and Social Media: Different platforms have preferred image dimensions for the best display. Resizing images ensures they look crisp and professional, whether on Facebook, Instagram, or your personal website.
Methods to Resize Images on an Android Device
1. Using Built-in Android Tools
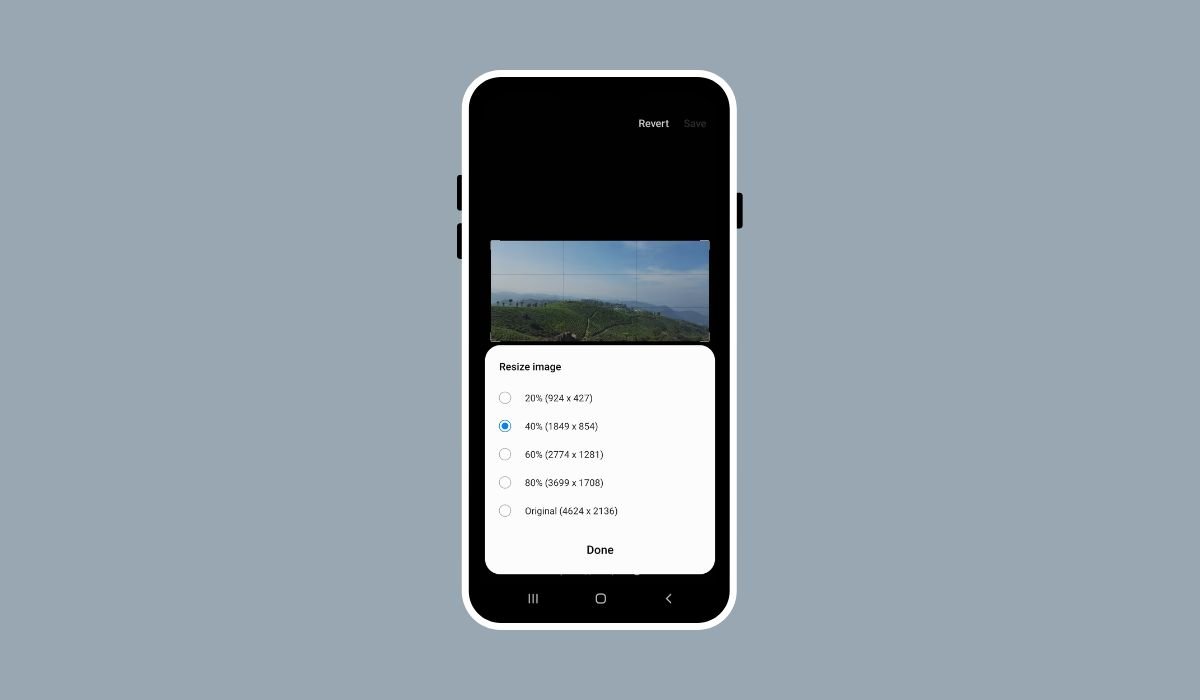
Many Android devices come with built-in photo editing tools, making resizing images simple. For example, Samsung’s Gallery app and Google Photos both offer basic editing features, including resizing.
Step-by-Step Guide:
- Open the Gallery app or Google Photos.
- Select the image you want to resize.
- Tap the “Edit” option, typically found at the bottom of the screen.
- Look for the resizing or cropping tool.
- Adjust the size by either setting a specific resolution or dragging the image dimensions.
- Save the resized image.
2. Using Third-Party Apps
If your Android device doesn’t have the desired resizing features, there are several third-party apps available.
Popular Apps for Resizing:
- Photo & Picture Resizer
- Image Size App
- Pixlr
Let’s walk through resizing an image using the Photo & Picture Resizer app.
Step-by-Step Guide:
- Download and install Photo & Picture Resizer from the Google Play Store.
- Open the app and select the image you want to resize from your gallery.
- Choose the “Resize” option.
- Enter the new dimensions or select a percentage to reduce the size.
- Save the resized image to your gallery.
3. Resizing Images Online via Android Browser
For quick resizing without installing any apps, online tools are an excellent option. Websites like TinyPNG or ImageResize allow you to resize images directly from your Android browser.
Steps to Resize Images Online:
- Open your browser and visit websites like TinyPNG or ImageResize.
- Upload the image you want to resize.
- Select the desired dimensions or let the website automatically compress the image.
- Download the resized image to your Android device.
These methods provide easy ways to resize images without hassle, whether you prefer built-in tools, apps, or online resources.
Also read: What Is Android Phone: A Complete Guide for Beginners
Tips for Resizing Without Losing Quality
- Maintain Aspect Ratio: When resizing, it’s important to keep the aspect ratio locked. This prevents the image from getting distorted or stretched. Most apps and tools have an option to maintain the aspect ratio, so the image’s height and width remain proportional.
- Use Lossless Compression: Some apps offer lossless compression, which reduces the file size without sacrificing image quality. Look for apps or tools with this feature to ensure your images stay sharp and clear, even after resizing.
- Choose the Right Dimensions: Choosing the appropriate dimensions depends on how you plan to use the image:
- Social Media Posts: For platforms like Instagram or Facebook, images should ideally be around 1080×1080 pixels for square images.
- Emails: For faster loading, stick to dimensions around 600×400 pixels.
- Web Use: If you’re adding images to a blog or website, sizes like 1200×628 pixels (for headers or banners) are commonly used for good balance between quality and speed.
By following these tips, you can resize images effectively without compromising quality.
Best Practices for Resizing Images for Different Platforms
Social Media (Facebook, Instagram, Twitter)
Each social media platform has preferred image dimensions to ensure your photos look their best.
- Facebook:
- Profile Picture: 180×180 pixels
- Cover Photo: 820×312 pixels
- Shared Images: 1200×630 pixels
- Instagram:
- Square Post: 1080×1080 pixels
- Portrait Post: 1080×1350 pixels
- Story: 1080×1920 pixels
- Twitter:
- Profile Picture: 400×400 pixels
- Header Photo: 1500×500 pixels
- In-Stream Photos: 1600×900 pixels
Sticking to these dimensions ensures your images display correctly without cropping or stretching.
Emails and Attachments
When sending images via email, smaller file sizes are essential to ensure fast delivery and smooth downloads for the recipient.
- Recommended size: Around 600×400 pixels is ideal for attachments and email campaigns.
- This size helps balance clarity with quick loading times, making it easier for people to open and view on various devices.
Websites and Blogs
For websites, images need to load quickly without compromising quality. This is crucial for improving page load speed and user experience.
- Featured Images (Banners): 1200×628 pixels
- Blog Post Images: 800×600 pixels
- Thumbnail: 150×150 pixels
Use these dimensions to keep your site visually appealing while optimizing loading speed, which is vital for SEO.
By following these best practices, your resized images will look sharp and load quickly, whether on social media, email, or your website.
Also read: All Android Operating System Names: A Complete List
When to Resize vs. Compress: Key Differences
Resizing and compressing are two techniques that often get confused, but they serve different purposes when it comes to image optimization.
Resizing
Resizing involves changing the actual dimensions (height and width) of an image. This method is ideal when you need to fit an image within specific size requirements, such as for social media, websites, or emails.
- When to use resizing:
- To adjust an image to a specific resolution (e.g., 1080×1080 pixels for Instagram).
- To fit an image to a certain space without distorting it.
- When the image needs to be displayed at a different size for aesthetic or functional reasons.
Compressing
Compressing reduces the file size of an image without necessarily altering its dimensions. There are two types of compression: lossy (which sacrifices some image quality) and lossless (which maintains quality). Compression is useful when the focus is on reducing the file size to save space or improve load times.
- When to use compressing:
- To decrease the file size for faster uploads or downloads.
- When sending images via email or messaging apps.
- To reduce the load time of web pages by making image files smaller without changing their appearance.
Key Differences:
- Resizing changes the image’s physical dimensions, affecting how large or small it appears.
- Compressing reduces the file size, which may or may not affect quality, but leaves the dimensions unchanged.
By knowing when to resize versus when to compress, you can effectively manage both the visual appearance and performance of your images.
Conclusion
Resizing images on your Android device is an essential practice for optimizing storage, speeding up uploads, and ensuring images look great on various platforms. With built-in tools like the Gallery app and Google Photos, along with third-party apps such as Photo & Picture Resizer and online tools like TinyPNG, resizing images has never been easier.
By understanding the right methods and tools, you can manage your image sizes efficiently without sacrificing quality. Explore these options to find the one that works best for your needs and keep your photos looking sharp while saving space.
FAQs
Can resizing images reduce their quality?
Resizing doesn’t necessarily reduce quality, but it can if the image is resized to very small dimensions. Always maintain the aspect ratio and avoid extreme resizing to keep the image clear.
What’s the difference between resizing and cropping an image?
Resizing changes the dimensions of the entire image, while cropping removes parts of the image to focus on a particular section. Cropping doesn’t reduce file size but changes the composition of the image.
Can I resize multiple images at once on an Android device?
Yes, some third-party apps, like Photo & Picture Resizer, allow batch resizing, making it easier to resize multiple images at the same time.
Which app is best for resizing images on Android?
Popular apps like Photo & Picture Resizer, Pixlr, and Image Size are user-friendly and effective for resizing images quickly.
Will resizing an image affect its file size?
Yes, resizing usually reduces the file size since you’re decreasing the image’s dimensions. For further size reduction, you can also compress the image after resizing.